20+ Common Bathtub Drain Stopper Types in 2025 – Which is best for your bathtub?
Choosing the right bathtub drain stopper is essential for creating a comfortable and functional bathing experience. With over 20 common
Staring at a stubborn drain that won’t budge? You’re not alone. Whether your stopper is stuck, corroded, broken, or you’re replacing the whole drain assembly before installing a new tub, removing a bathtub drain is one of those jobs that looks intimidating until you know exactly what type of drain you’re dealing with.
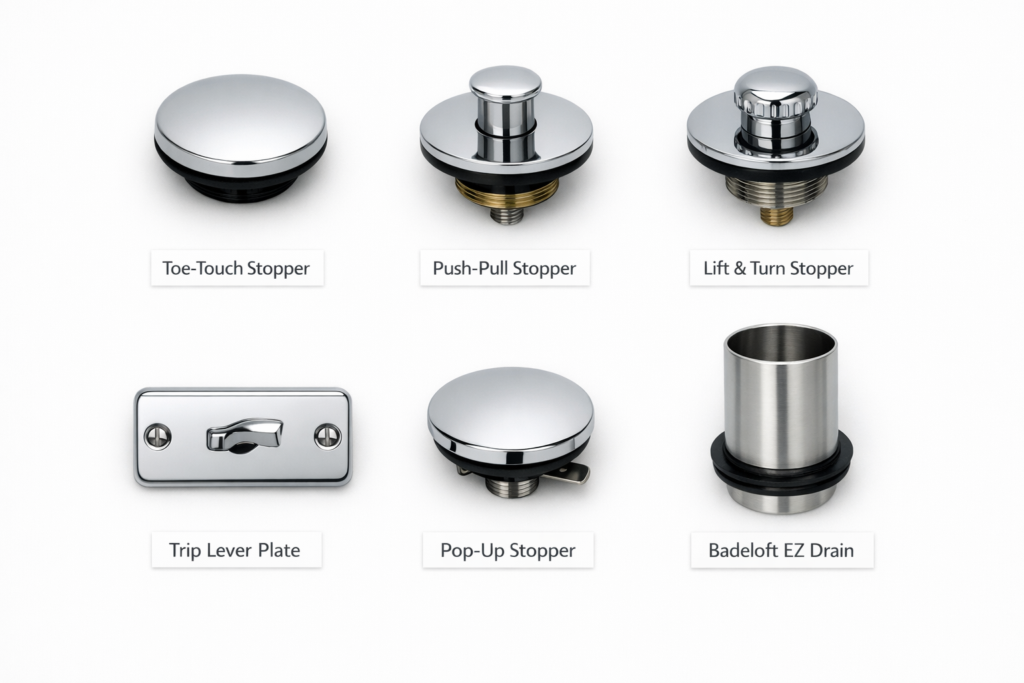
Here’s the thing most guides miss: there isn’t one way to remove a bathtub drain — there are six. Each stopper type has a different mechanism, and using the wrong technique on the wrong drain can strip threads, crack the drain body, or leave you worse off than when you started.
In this guide, we’ll walk through every drain type — toe-touch, push-pull, lift-and-turn, trip lever, pop-up, and EZ drop-in — with clear numbered steps and the exact tools you need for each. We’ll also cover removing the drain flange itself when you need to replace the entire drain body.
You likely won’t need all of these — grab what applies to your drain type. We’ll call out the relevant tools in each section below.
Manufacturer’s Take: At Badeloft, we see a lot of drain-related calls that come down to one mistake: people trying to remove a drain without first identifying the type. A lift-and-turn stopper unscrews from the top. A toe-touch stopper has a set screw at the base. Confuse the two and you’ll spin in circles — literally. Spend 60 seconds identifying your drain type first. It saves hours.
Before picking up a single tool, answer this question: what kind of stopper do you have?
Start here: Do you see a stopper cap sitting inside the drain opening?
Yes — Does it have a small knob or handle on top?
No stopper visible in drain, but there’s a lever on the overflow plate → Trip Lever drain (go to Section E)
Freestanding tub drain, drop-in style, connects to floor pipe → EZ Drop-In drain (go to Section F)
Not sure? Check our full guide to common bathtub drain stopper types for photos of each.
So you’ve identified your drain type — now what?
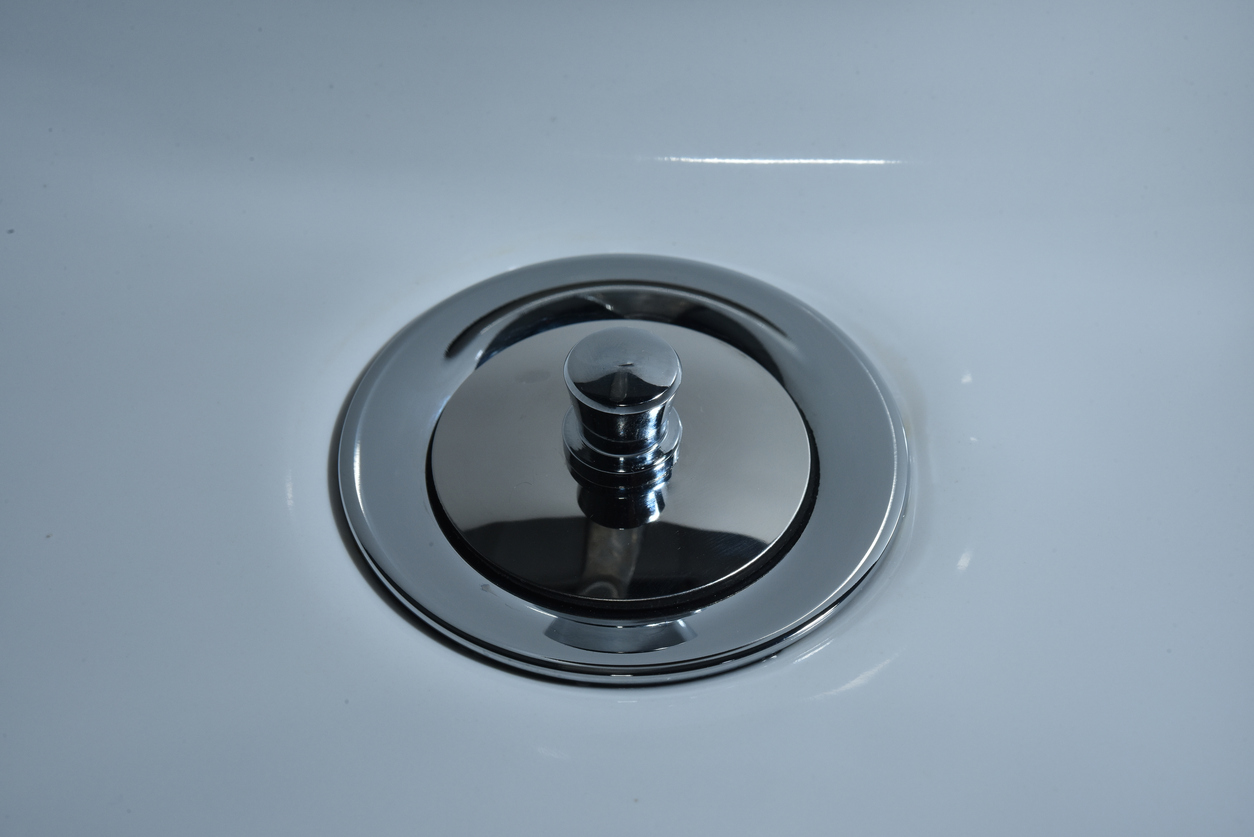
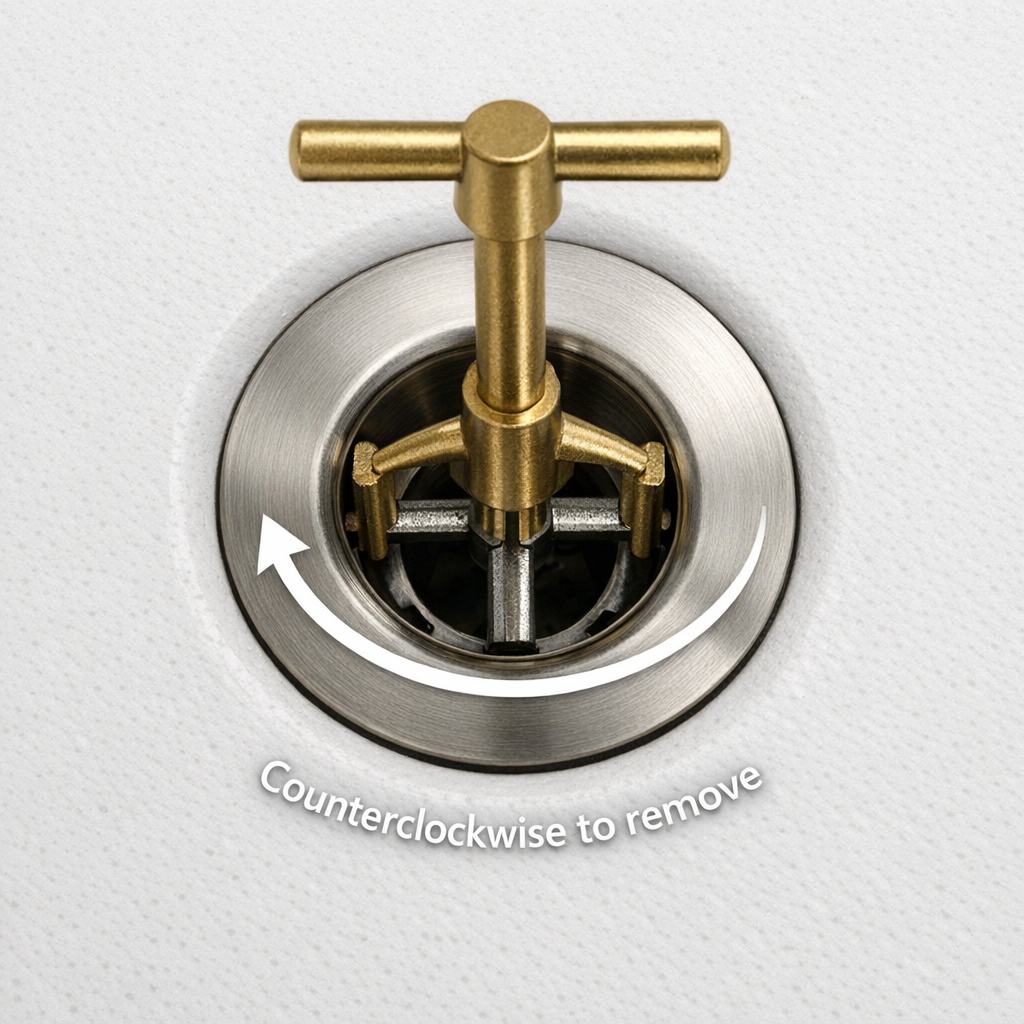
The lift-and-turn is one of the most common stoppers in North American bathrooms. You twist the top knob to open or close the drain, and it lifts slightly as it opens.
How to identify it: Small knob on top. Rotate it clockwise to close (stopper drops), counterclockwise to open (stopper rises).
Tools needed: Flathead screwdriver, needle-nose pliers (optional)
Stuck? Grip the stopper body with a cloth for better traction and apply steady counterclockwise pressure. Avoid pliers directly on chrome finishes — they’ll scratch.
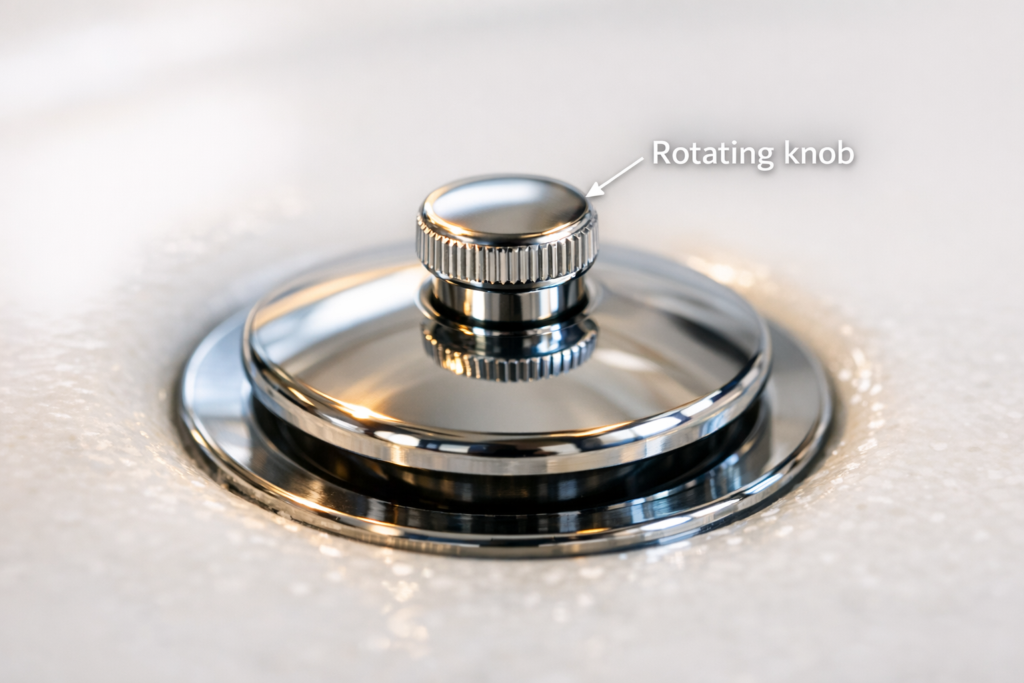
Push-pull stoppers work exactly like they sound: push down to close, pull up to open. They look similar to lift-and-turn models, but the mechanism is different.
How to identify it: Has a knob on top, but rotating the knob does nothing — the stopper only moves up and down vertically.
Tools needed: Flathead screwdriver
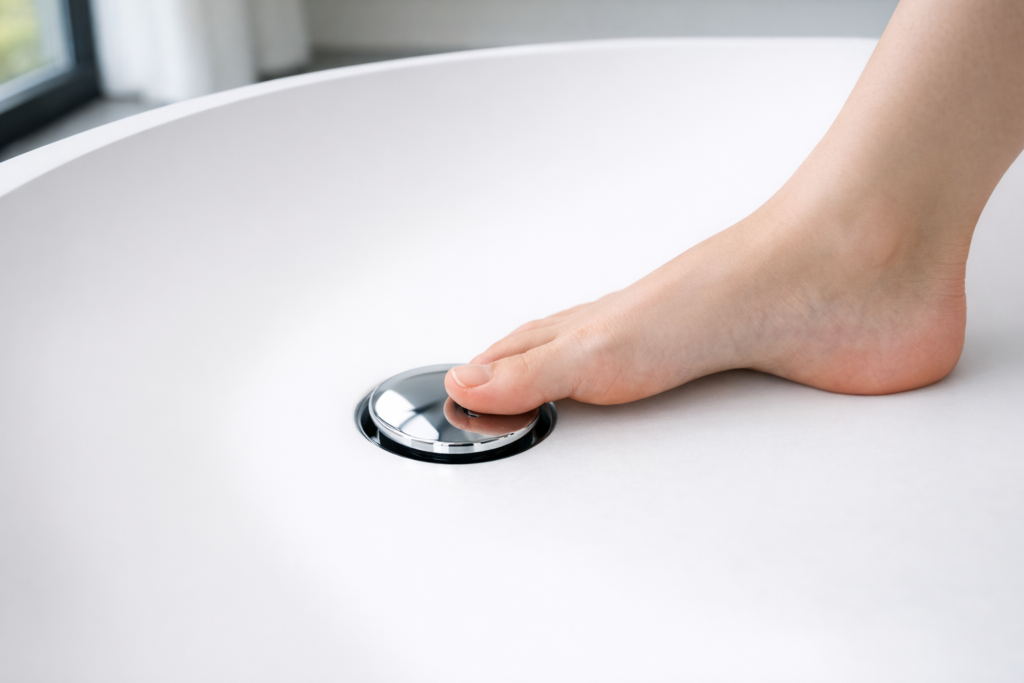
Toe-touch stoppers are popular in modern tubs because they have no visible hardware — just a smooth cap you tap open with your foot. But that clean look can make removal feel mysterious.
How to identify it: No knob or lever. Smooth cap. Push down once to close, push again to open (spring mechanism).
Tools needed: Flathead screwdriver
Manufacturer’s Take: Toe-touch stoppers are one of our most recommended upgrades for stone resin freestanding tubs. The no-hardware look suits the clean lines of a freestanding design beautifully. But if the spring mechanism fails — and they do fail over time — replacement is straightforward using the steps above.
Pop-up stoppers are mechanically connected to the overflow plate via a rocker arm and trip rod. Removing just the stopper is simple; removing the whole mechanism requires accessing the overflow plate.
How to identify it: The stopper lifts up and down automatically when you flip the lever on the overflow plate (the decorative plate above the drain on the tub wall). No manual contact with the stopper needed.
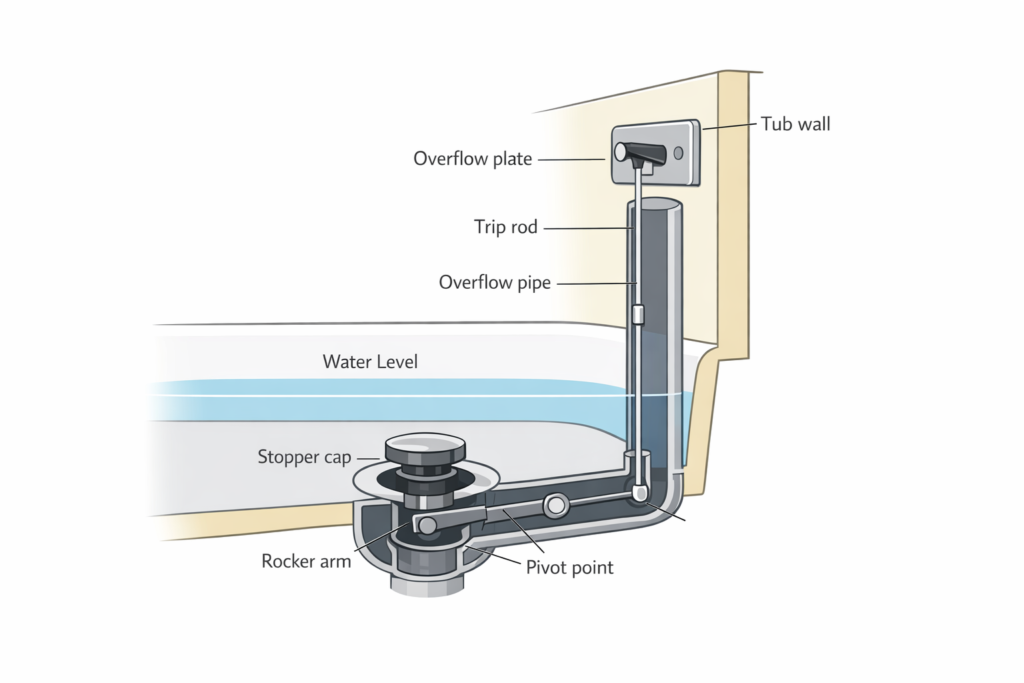
Tools needed: Pliers (optional), Phillips or flathead screwdriver (for full assembly removal)
For a full breakdown of the overflow drain system, see our guide to the bathtub overflow drain.
Trip lever drains use a plunger hidden inside the overflow pipe — there’s no visible stopper in the drain opening itself. The overflow lever raises and lowers the plunger to block or release water flow.
How to identify it: The drain opening is always open (no stopper visible). Water is held by a plunger inside the overflow pipe. There is a lever or handle on the overflow plate.

Tools needed: Phillips or flathead screwdriver, needle-nose pliers
Manufacturer’s Take: Trip lever drains are the most likely to cause phantom slow drains. The plunger assembly inside the overflow pipe collects debris you’d never see from above. If your tub drains slowly and the stopper appears fine, this is almost always the culprit. Pull the trip lever assembly and clean it before calling a plumber.
What if you need to remove more than just the stopper?
If you’re replacing a broken drain, upgrading to a new finish, or installing a new tub altogether, you need to remove the drain flange — the metal ring threaded into the drain shoe in the tub floor. This is a different job from removing a stopper.
Tools needed: Drain key / tub drain wrench, tub drain extractor (if crossbars are broken), penetrating oil, utility knife, rubber mallet (optional)
If the crossbars are broken or missing:
Use a tub drain extractor (sometimes called a dumbbell tool). It grips the inside of the drain barrel rather than the crossbars, giving you purchase even on stripped or corroded drain bodies.
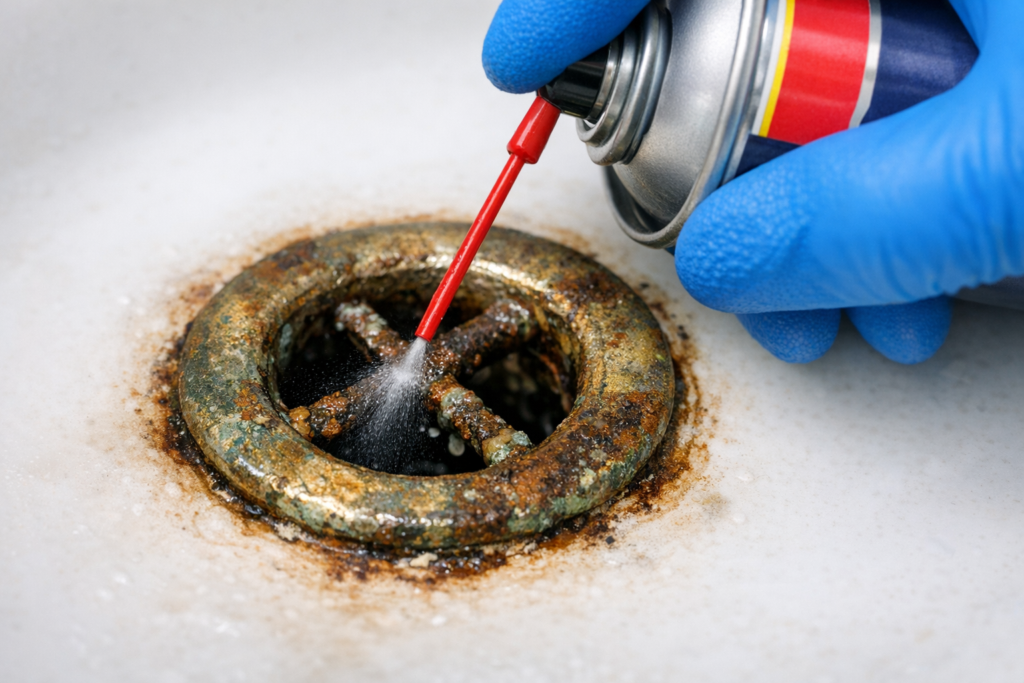
Manufacturer’s Take: One of the most common calls we get from customers is about stuck drain flanges in older tubs. Years of caulk, mineral buildup, and corrosion can make a drain feel like it’s welded in. The penetrating oil step is not optional — it’s what separates a 20-minute job from a 2-hour one. Give it time to work.
If you own a Badeloft freestanding tub (or are planning to buy one), you’re working with our EZ drop-in drain system — and removal works differently from a traditional threaded drain.
How to identify it: The drain on a Badeloft freestanding tub drops down into a floor receiver pipe rather than threading directly into a drain shoe in the tub floor. The tub literally sits on top of the drain connection.
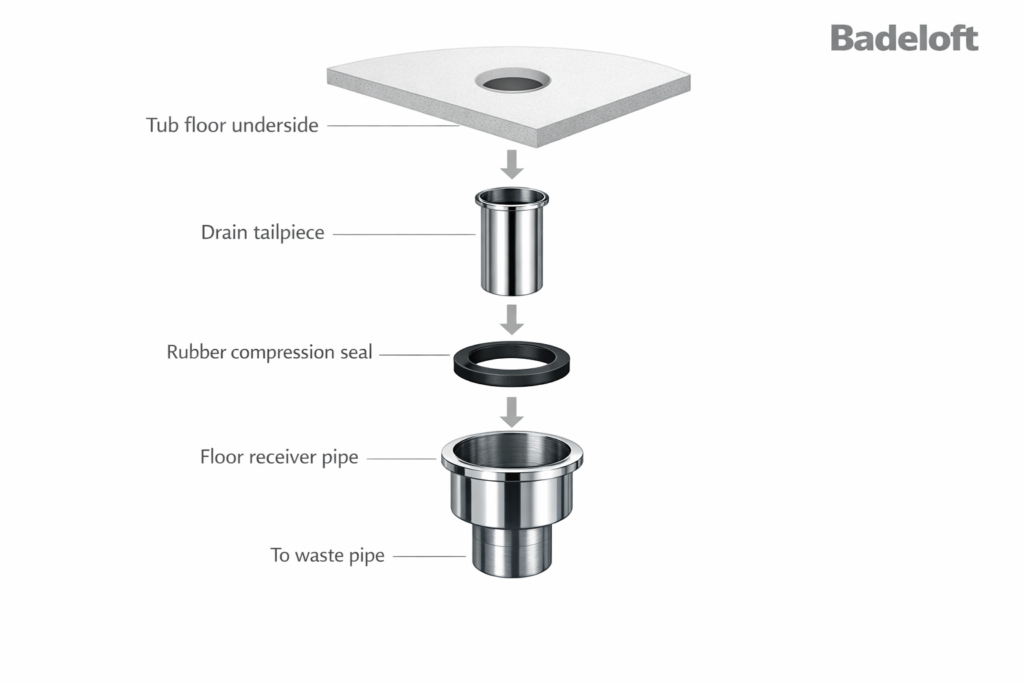
Why it exists: Traditional freestanding tub drain installations require access panels, cutting into floors or ceilings, and precise rough-in measurements. The EZ drop-in eliminates that complexity. It’s designed so that drain access, adjustment, and removal don’t require any major disassembly. No access panel needed.
For complete installation and removal instructions, see our guide to installing a freestanding bathtub.
Manufacturer’s Take: The EZ drop-in drain was designed specifically because we heard from too many customers who had damaged their floors, called plumbers unnecessarily, or delayed tub installation for weeks waiting for access panel work. If you’re replacing an old tub or upgrading to a freestanding design, this is worth factoring into your buying decision. No competitors ship this system as a standard inclusion — we do. See our full lineup of freestanding bathtubs and the EZ drop-in drain product page.
But do you actually need a new drain, or just a good cleaning?
| Situation | Recommended Action |
|---|---|
| Stopper won’t open/close but looks intact | Remove and clean — hair and soap scum are usually the culprit |
| Stopper mechanism is broken or stripped | Replace the stopper only (not the flange) |
| Drain drains slowly even with stopper open | Pull and clean the trip lever assembly or check the P-trap |
| Drain flange is corroded or leaking at the seal | Replace the full flange and reapply plumber’s putty |
| Upgrading tub finish (e.g., chrome to matte black) | Replace flange for aesthetic match |
| Installing a new freestanding tub | Consider an EZ drop-in drain system to avoid rough-in complications |
Using the wrong tool for the drain type. A standard wrench won’t fit the inside of a drain barrel. Get a drain key.
Skipping the penetrating oil step. On older drains, this is not optional. Forcing a corroded drain will strip it.
Pulling too hard on a pop-up stopper. The rocker arm below the stopper can snap if you yank it. Steady, straight-up pressure only.
Forgetting the set screw. Both lift-and-turn and toe-touch stoppers often have a small set screw that must be loosened before the stopper will come free.
Twisting the waste shoe. When removing the drain flange, if you feel the entire assembly rotating (not just the flange), stop immediately. The waste shoe below can crack the drain connection to the pipe.
Look at the drain from above. If there’s a knob on top that rotates, it’s a lift-and-turn. If it just pushes up and down, it’s push-pull. If you press it with your toe to open and close, it’s a toe-touch. If there’s a lever on the overflow plate above the drain and no stopper is visible in the drain hole, it’s a trip lever. See our full guide to common bathtub drain stopper types.
For the stopper itself, usually not — a flathead screwdriver handles most types. To remove the drain flange, you’ll want a drain key or tub drain wrench. These are inexpensive and widely available at hardware stores.
The most common reasons: there’s a set screw you haven’t loosened yet, the threads are corroded and need penetrating oil, or you’re turning in the wrong direction. For a toe-touch stopper, check for a set screw on the side of the cap shaft before applying force.
Most homeowners can remove a drain flange with a drain key and patience. Where DIY gets risky is with heavily corroded drains or when the waste shoe connection is old and fragile. If the drain resists heavily even after penetrating oil, and especially if you’re working with a cast iron tub surround, consider calling a professional.
Use cloth or rubber grips rather than bare metal pliers. On stone resin or acrylic tubs especially, protect the surface with a cloth beneath any tools. The Badeloft stone resin finish is highly durable, but metal tools dragged across the basin can still leave marks.
It depends on the drain system. Traditional freestanding tubs use the same threaded drain flange as built-in tubs. Badeloft’s EZ drop-in drain system uses a no-thread, drop-fit connection that lifts out when the tub is shifted — no access panels or plumbing disassembly required. See the installing a freestanding bathtub guide for details.
This usually means the drain shoe beneath the tub floor is rotating with the flange instead of staying fixed. Stop immediately — continuing to spin can break the seal or crack the drain connection. This typically requires accessing the drain shoe from below, which may be a job for a plumber.
Removing a stopper: 5–15 minutes. Removing a drain flange: 20–45 minutes, including prep and penetrating oil wait time. A trip lever assembly: 10–20 minutes. If you hit serious corrosion, add another 30 minutes minimum.

Removing a bathtub drain is a manageable DIY job once you know your drain type and have the right tools in hand. The difference between a 15-minute job and a two-hour frustration usually comes down to one thing: identifying the mechanism before you start.
If you’ve been fighting a worn-out drain on an aging tub — or you’re planning a bathroom renovation — it might be worth thinking beyond the repair. Badeloft’s freestanding bathtubs ship with the EZ drop-in drain included, a system specifically designed to eliminate the installation and removal headaches that traditional drains create. No access panels. No specialized plumbing rough-in. Just a clean, modern drain that fits the design and the function.
Still planning your installation? Our complete guide to installing a freestanding bathtub walks through every step from rough-in to first fill.

Eric is the founder and president of Badeloft USA. He has been the president of Badeloft’s US division for over ten years and oversees all marketing and branding aspects of Badeloftusa.com.
His expertise lies in small business development, sales, and home and bathroom industry trends and information.
Contact us with any business related inquiries.
Badeloft is dedicated to helping homeowners make informed decisions about their bathrooms. We adhere to strict editorial guidelines to ensure our content is accurate, trustworthy, and useful.
Request free stone resin and stainless steel material samples. Delivered to your door.
Choosing the right bathtub drain stopper is essential for creating a comfortable and functional bathing experience. With over 20 common
A soaking tub is defined by one thing: depth. Where a standard alcove tub sits around 14 inches deep, a

Spring is when most bathroom remodels get serious. The weather breaks, contractors open up, and that upgrade you have been
A Japanese soaking tub, known traditionally as an ofuro, is designed for one purpose: full-body immersion. Unlike Western bathtubs built
Request your free material sample below. By submitting, you agree to receive occasional product updates and offers from Badeloft. Unsubscribe anytime.
"*" indicates required fields