Choosing a Bathtub for Two: Sizes, Features, Installation & Other Considerations Before You Purchase
There’s a gap between what a freestanding bathtub listing tells you and what it actually feels like to share one.
Your bathtub drain does two jobs: controls the water level and move waste water out. When it fails at either one; a clog that won’t clear, a stopper that won’t seal, a drain that’s corroded or leaking, you need to know which part is the problem and what to do about it.
This guide covers all of it: how the drain system is built, how to clear a clog yourself before calling a plumber, how to remove and replace the drain flange, and how to tell when a repair is the right call versus a full replacement.
A bathtub drain system is a system that allows for water to drain from your shower back into the water system. The system is designed in such a way that water drains through the shower, but is released at a controlled rate as to not overflow the pipe or run the risk of damaging the internal pipeline. This is accomplished through a tier system that controls the level of water throughout the drain system, ensuring that the water level is always at a controllable quantity.
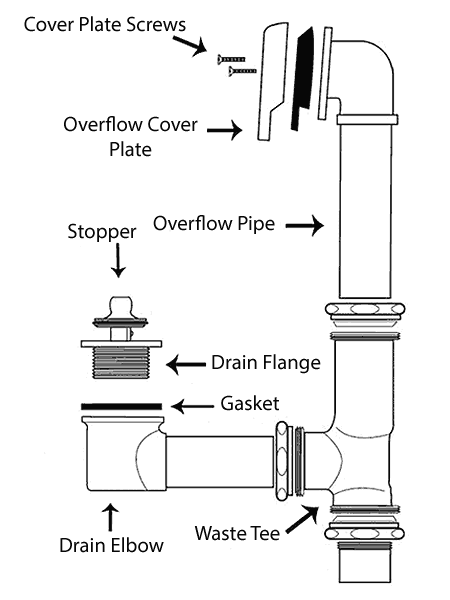
Your drain system may seem complicated at first, but given time and a little experience, it can be quite easy to diagnose problems should they occur.
Here are the main components of a drain system to better help you fix problems that may arise.
Most bathtub drain clogs are within two feet of the drain opening. They’re almost always hair combined with soap buildup — a physical blockage, not a chemical one. Start with the simplest methods before escalating.
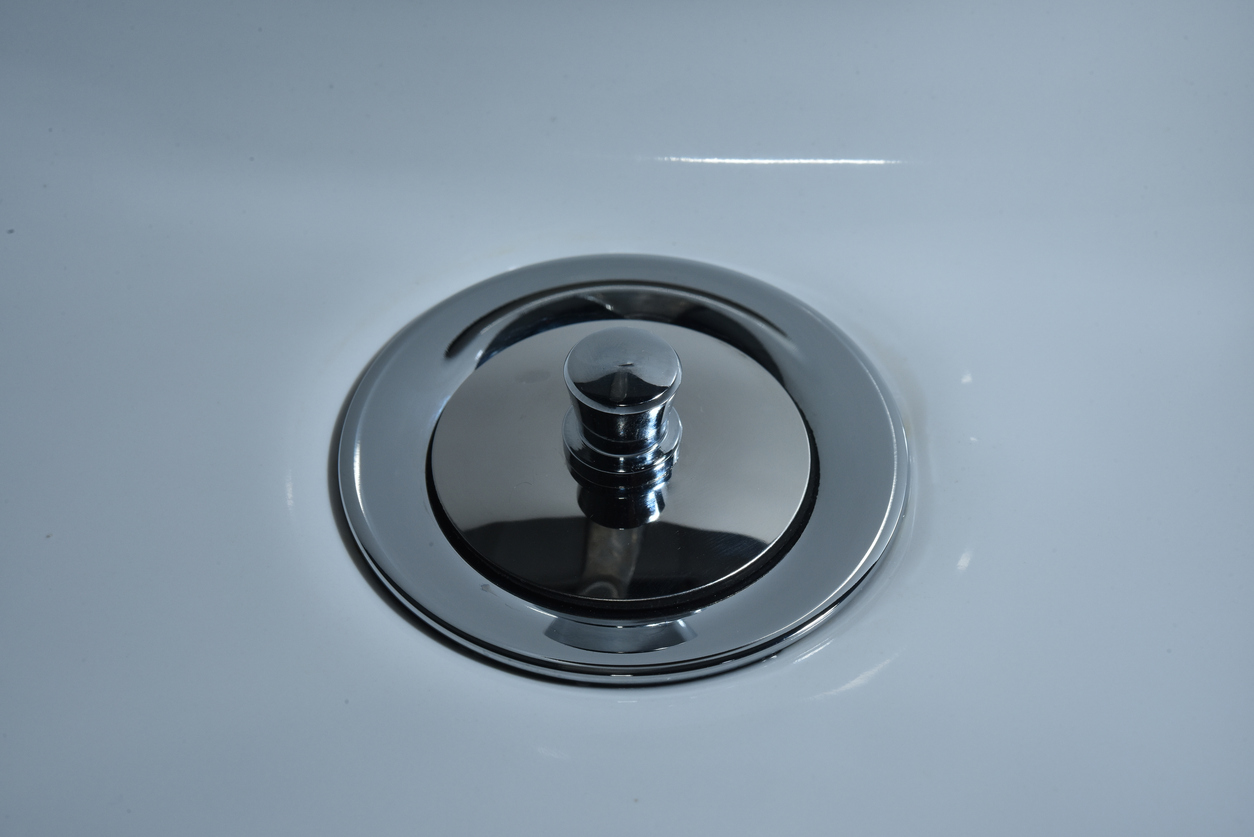
This is the first thing to try and solves the majority of shower/tub drain clogs. Most stoppers twist or pull out. Once removed, use a hair snake (a long flexible plastic strip with barbs, available for $3–5) to pull out the accumulation below the drain opening. It’s not pleasant, but it works.
For soap and grease buildup (not hair), pour boiling water directly into the drain in two stages: half the kettle, wait 30 seconds, then the rest. This melts soap buildup and can clear partial clogs. Do not use on PVC pipes—extremely hot water softens PVC over time. Use hot tap water instead if you’re unsure of your pipe material.
For stone resin bathtubs: Do not pour boiling water directly onto the tub surface around the drain. The drain flange and interior of the pipe are fine. The issue is thermal shock on the stone resin surface near the drain—use hot tap water instead of boiling to be safe.
Pour one cup of baking soda into the drain, followed by one cup of white vinegar. The fizzing reaction loosens debris. Cover the drain opening immediately and wait 20 minutes, then flush with hot water. This works well on soap scum and partial clogs but is less effective on heavy hair blockages.
Cover the overflow drain opening with a wet rag before plunging—this is the step most people skip. Without it, pressure from the plunger vents through the overflow instead of pushing against the clog. A standard cup plunger works for tub drains. Plunge firmly 10–15 times, then test drainage.
For clogs further down the pipe, a hand-crank drain snake reaches 15–25 feet into the line. Feed it until you feel resistance, then rotate to catch the blockage and pull it out. Electric snakes (rentable from hardware stores) handle deeper or more compacted blockages. This is the most reliable method for serious clogs.
If the drain still runs slowly after a snake treatment, the clog is likely past your P-trap and into the main line. Signs the problem is deeper: multiple drains slow simultaneously, gurgling in other fixtures when you drain the tub, or sewage smell. These require professional clearing.
You’ll need to remove the drain flange when replacing the drain, reseating a leaking gasket, or accessing the drain body for major repairs.
What you need:
If you have a trip-lever or plunger-style stopper, remove the overflow plate first (two screws) and pull the linkage assembly out through the overflow opening. For all other stopper types, see the stopper removal section in [link: drain stopper types guide].
Turn counterclockwise. The flange is threaded into the drain shoe below.
Corroded flanges in older cast iron drain shoes may require significant torque—brace your free hand against the tub floor (not the wrench) to avoid slipping.
The gasket (rubber ring seated between the flange and the tub) will come with it or stay in the seat below.
A failed gasket is the most common cause of drain leaks that appear below the tub, not at the drain opening.
For heavily corroded flanges, a drain extraction tool (available at plumbing supply stores) provides more torque than a standard drain wrench. As a last resort, the flange can be cut with an oscillating tool and removed in pieces, the drain shoe remains intact and a new flange threads in normally.
Replacement is the right call when: the flange is corroded through, the drain shoe (below the tub) is cracked, the gasket has failed and caused water damage below the tub, or you’re replacing the tub entirely and need to match the new drain profile.
What you need:
The 7 Steps to reeplace a bathtub drain
Stone resin tubs have a solid drain seat, the drain flange presses against the material directly. Use plumber’s putty (not silicone) at the flange-to-tub contact point. Silicone works and seals well but bonds chemically to the stone resin surface, making future drain removal significantly harder. Plumber’s putty compresses into a mechanical seal and remains workable for future service.
Installing a drain on a new tub before the tub is in position is substantially easier than accessing it afterward. These are the steps most relevant to anyone installing a freestanding soaking tub for the first time.
Before the tub is placed:
After the tub is placed:
For freestanding tubs: the drain line typically runs under the floor to the existing waste stack. If your rough-in is in the wrong location, this is a plumbing relocation—budget $500–1,500 for a licensed plumber to move it.
If you’re replacing a failing alcove tub and its drain system entirely, a freestanding soaking tub from Badeloft eliminates the built-in drain assembly complexity, freestanding drains are accessible from all sides

Eric is the founder and president of Badeloft USA. He has been the president of Badeloft’s US division for over ten years and oversees all marketing and branding aspects of Badeloftusa.com.
His expertise lies in small business development, sales, and home and bathroom industry trends and information.
Contact us with any business related inquiries.
Badeloft is dedicated to helping homeowners make informed decisions about their bathrooms. We adhere to strict editorial guidelines to ensure our content is accurate, trustworthy, and useful.
Request free stone resin and stainless steel material samples. Delivered to your door.
There’s a gap between what a freestanding bathtub listing tells you and what it actually feels like to share one.
The bathtub you choose will shape how you use your primary bathroom every day for the next two decades. Not
A freestanding bathtub is the most permanent aesthetic decision in a bathroom renovation. Get the selection right and it becomes
Choosing the right bathtub drain stopper is essential for creating a comfortable and functional bathing experience. With over 20 common
Request your free material sample below. By submitting, you agree to receive occasional product updates and offers from Badeloft. Unsubscribe anytime.
"*" indicates required fields