20+ Common Bathtub Drain Stopper Types in 2025 – Which is best for your bathtub?
Choosing the right bathtub drain stopper is essential for creating a comfortable and functional bathing experience. With over 20 common
Your bathtub faucet is dripping. Or maybe it wobbles when you turn it. Or you just bought a gorgeous freestanding tub and realized the old chrome spout looks completely out of place next to it. Whatever brought you here, you are in the right spot.
Bathtub faucet replacement is one of those home projects that sounds intimidating but is usually very manageable — if you know what type of faucet you are dealing with. The process for a standard wall-mount spout is completely different from replacing a floor-mount freestanding tub filler, and most guides treat them as the same thing. They are not.
This guide covers all three faucet types — wall-mount, freestanding floor-mount, and deck-mount — and gives you a clear decision tree for when it makes more sense to repair versus replace. We also include honest cost estimates so you know what to budget before you buy anything.
Before you buy a replacement or pick up any tools, you need to identify your faucet type. The replacement process — and the parts you need — vary significantly by type. For a deeper breakdown of styles and how they function, see our complete guide to tub fillers.
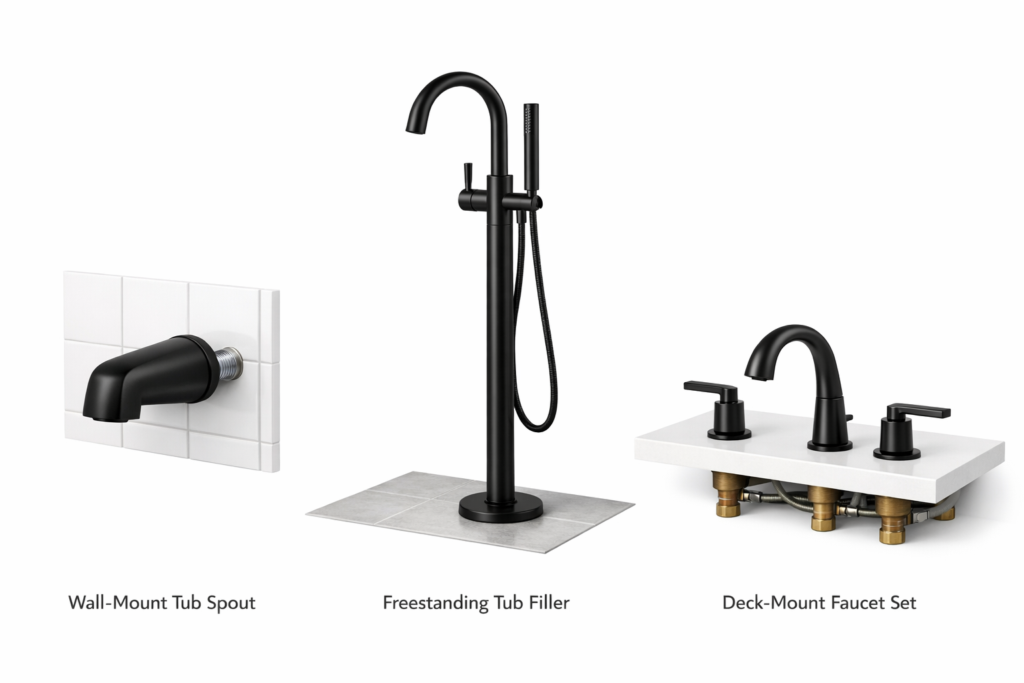
There are three common configurations found in residential bathrooms:
The most common type. The spout attaches directly to a pipe stub coming out of the wall, usually above or near the tub surround. It may be slip-fit (secured with a set screw) or threaded. The valve handles are also in the wall.
The faucet handles and spout mount through holes drilled in the tub deck or surround ledge. Common on drop-in and freestanding tubs that have a flat deck. Requires access from below the deck for installation.
Supply lines come up through the floor, and the entire faucet assembly stands independently on the floor beside the tub. Found almost exclusively with freestanding bathtubs. This is the most visually dramatic option and the one that most DIY guides overlook entirely.
Manufacturer’s Take: Knowing your faucet type before you shop is non-negotiable. We see customers order a deck-mount faucet for a tub that has no deck holes, or a floor-mount filler when their supply lines are in the wall. The faucet type must match your existing rough-in plumbing — or you are in for a full plumbing rough-in, not a simple swap.
This is the question most people skip, and it costs them either unnecessary repair time or an unnecessary purchase. Here is a simple decision framework.
| Situation | Recommended Action | Reason |
|---|---|---|
| Dripping spout, faucet under 10 years old | Repair | Cartridge or washer replacement — $10–$30 in parts |
| Dripping spout, faucet over 15 years old | Replace | Parts may be discontinued; not worth the labor |
| Handle is loose or wobbly | Repair | Usually a set screw or cartridge seat issue |
| Visible corrosion or finish peeling | Replace | Cosmetic damage is permanent |
| Leaking behind the wall or floor | Call a plumber | Potential pipe joint failure — not a DIY fix |
| Upgrading tub finish (e.g., going matte black) | Replace | Mixing finishes looks mismatched |
| Full bathroom remodel | Replace | Clean slate; match everything at once |
| Freestanding tub filler wobbles at the base | Inspect floor flange | Often a loose floor mount, not a faucet failure |
Manufacturer’s Take: We always tell customers — repair a leaky faucet first if the fix is straightforward and the faucet is in good shape. But if your faucet finish is flaking, if the brand is obscure and parts are hard to find, or if you just invested in a new stone resin freestanding tub, replacement is the smarter long-term move. A faucet and tub that don’t match visually will bother you every single day.
If you are leaning toward repair — good. A leaky bathtub faucet wastes significant water and the fix is often simpler than you think.

So what does a standard wall-mount replacement actually look like?
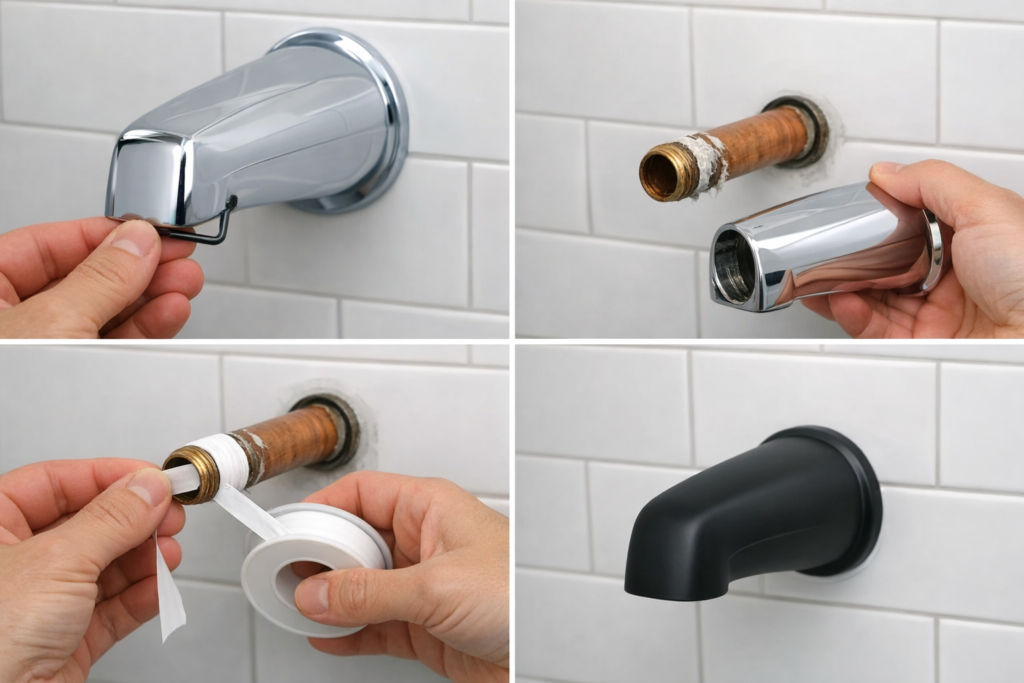
Wall-mount tub spout replacement is the most common type of bathtub faucet replacement, and it is genuinely beginner-friendly. Most homeowners complete this in 30–60 minutes.
What about freestanding tub fillers — the ones most DIY guides skip entirely?
This is where most DIY guides fall short. Replacing a freestanding tub filler is a fundamentally different process from swapping a wall-mount spout. The supply lines come up through the floor, the faucet mounts to a floor flange, and the rough-in dimensions must match your existing plumbing.
If you are shopping for a new freestanding tub to go with your replacement filler, see our guide to choosing a freestanding bathtub for sizing and placement tips.
Manufacturer’s Take: Freestanding tub fillers are not interchangeable between brands without checking rough-in dimensions. The distance between the hot and cold supply line stub-outs in the floor — typically 3.5″ to 8″ apart depending on the model — must match your new filler’s inlet spacing. Measure before you order.
What if your faucet mounts through the tub deck instead?
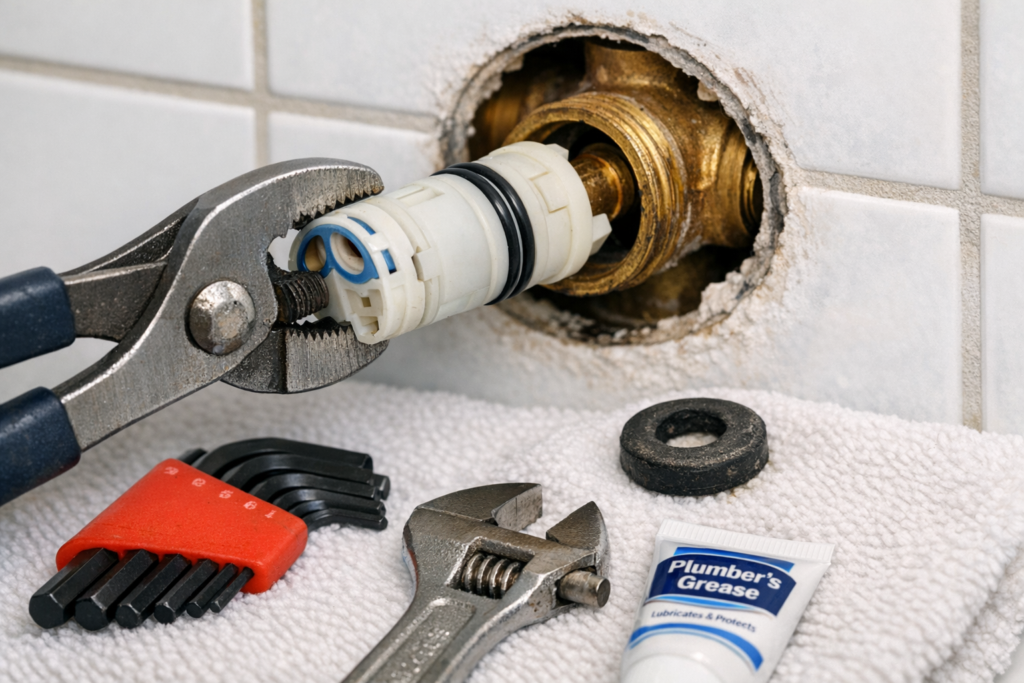
Deck-mount faucets install through holes in the tub deck or surround ledge. The replacement process requires access underneath the deck — either from below (if the tub sits on a platform or framing) or through the tub itself.
Manufacturer’s Take: Deck-mount faucets are where finish matching really matters. If you are replacing because the finish has worn, resist the temptation to buy the cheapest replacement available. Thin PVD coatings on budget faucets will fail again in 2–3 years. Look for solid brass construction with a quality PVD or electroplated finish — it is the difference between a faucet you replace once and one you replace every few years.
How much should you budget? It depends heavily on faucet type and whether you hire a plumber. For a complete look at cost factors, see our dedicated bathtub faucet replacement cost guide.
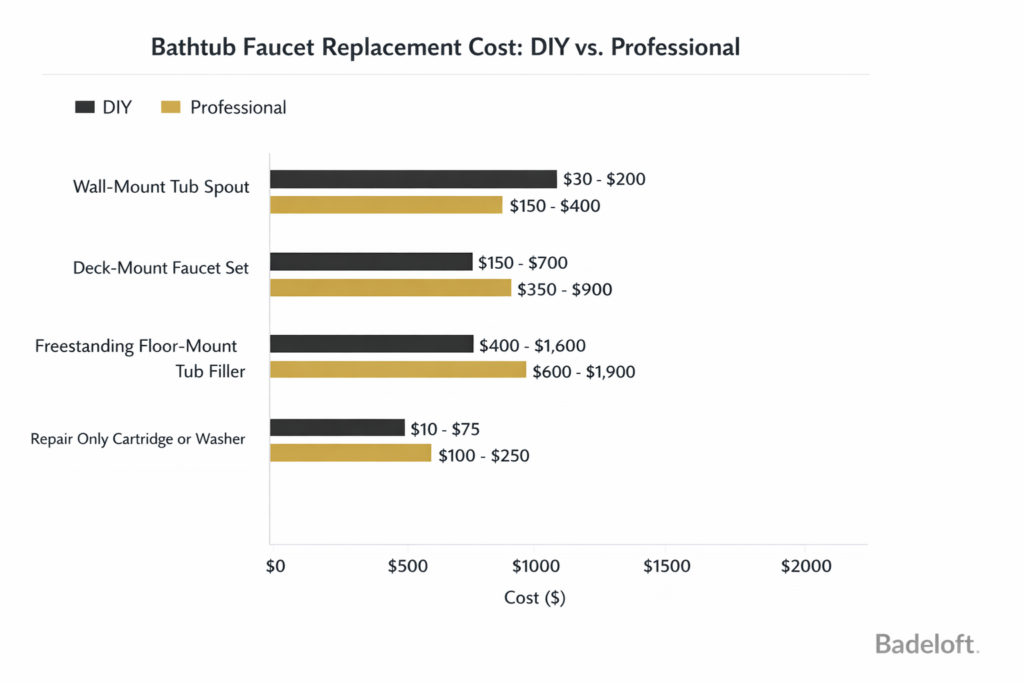
| Faucet Type | Faucet Cost (mid-range) | DIY Total | Plumber Labor | Pro Install Total |
|---|---|---|---|---|
| Wall-mount tub spout | $30–$150 | $30–$200 | $85–$200/hr (1 hr) | $150–$400 |
| Deck-mount faucet set | $150–$600 | $150–$700 | $85–$200/hr (1.5–2 hrs) | $350–$900 |
| Freestanding floor-mount tub filler | $400–$1,500+ | $400–$1,600 | $85–$200/hr (2–3 hrs) | $600–$1,900+ |
| Repair (cartridge/washer only) | $10–$50 in parts | $10–$75 | $85–$150 (service call) | $100–$250 |
Is your replacement faucet going to look right next to everything else in the bathroom? Finish matching is one of the most overlooked parts of a bathtub faucet replacement — and one of the most visually impactful.
Common finish families and what they pair with:
Manufacturer’s Take: When you pair a Badeloft stone resin freestanding tub with one of our tub fillers, finish consistency is built into the choice — you pick the finish once and it matches across the whole fixture set. When replacing a faucet in an existing bathroom, try to match the towel bars, toilet paper holder, and other hardware in the room. A single mismatched finish in an otherwise cohesive bathroom stands out immediately.
Even experienced DIYers make these mistakes. Avoid them.
A wall-mount tub spout swap takes 30–60 minutes for most homeowners. A deck-mount faucet replacement typically takes 1–2 hours. A freestanding floor-mount tub filler replacement takes 2–4 hours depending on access and plumbing condition.
Yes, for most wall-mount spout replacements and many deck-mount swaps. Freestanding tub filler replacement is also DIY-friendly if you are comfortable with basic plumbing — but if the floor supply stubs are corroded or the rough-in does not match, call a licensed plumber.
If the drip is from the spout or handle and the faucet is under 10 years old, repair first — replace the cartridge or washer. If the finish is peeling, the faucet is corroded, parts are unavailable, or you are remodeling, replace the faucet entirely.
A simple wall-mount spout costs $30–$150 in parts plus an hour of your time if you do it yourself. A freestanding tub filler replacement can run $400–$1,500 in fixture cost plus $200–$600 in professional labor. See our full bathtub faucet replacement cost guide for a detailed breakdown.
Not without rerouting your plumbing. Freestanding floor-mount fillers require supply lines that come up through the floor. If your supply lines are in the wall, you would need a licensed plumber to re-route them — it is a significant project, not a simple swap.
For a wall-mount spout: Allen wrench, utility knife, Teflon tape, and silicone caulk. For deck-mount: basin wrench, adjustable wrench, plumber’s putty. For freestanding filler: channel-lock pliers, adjustable wrench, level, Teflon tape, and silicone.
Start by replacing the cartridge or washer inside the valve body — this resolves most drips. If the drip continues after cartridge replacement, the valve seat may be worn or damaged. At that point, full faucet replacement is usually more cost-effective than further repair attempts.
In most jurisdictions, a like-for-like faucet replacement does not require a permit. However, if you are rerouting supply lines or changing the type of installation, a permit is typically required. Check with your local building department.
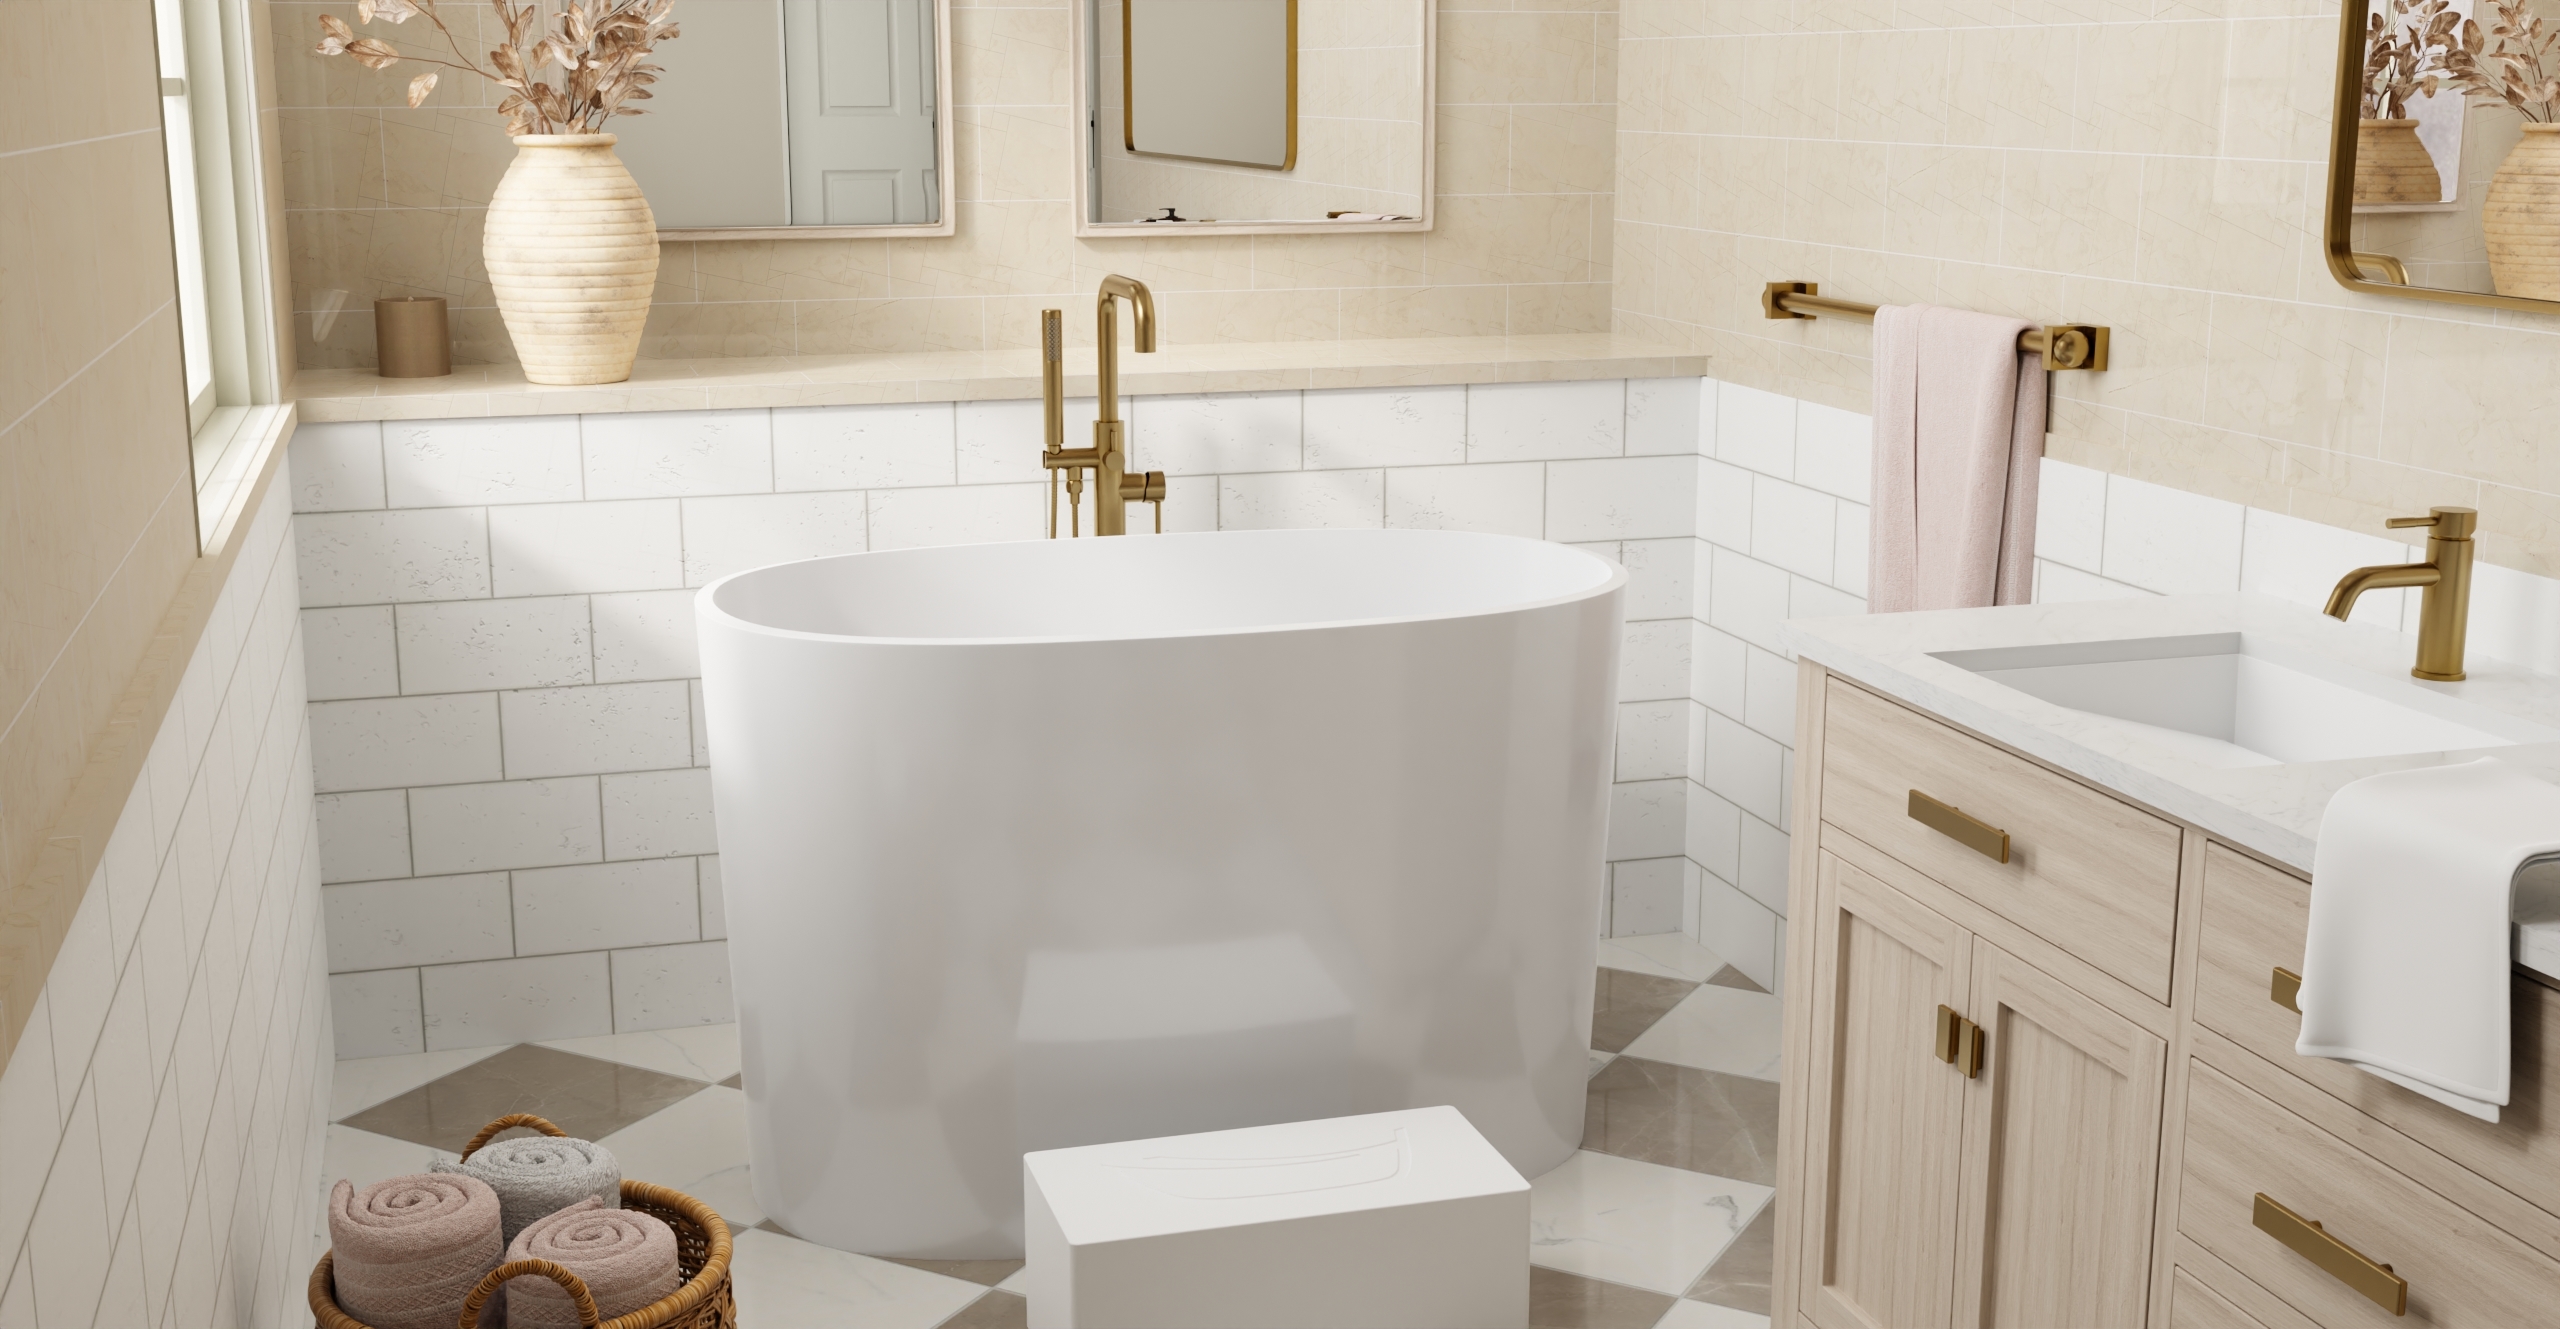
If you are replacing a faucet on a freestanding tub — or planning a new freestanding setup from scratch — the filler you choose defines the look of the entire bathroom.
Our freestanding faucets and tub fillers are designed to pair with Badeloft’s stone resin freestanding tubs, available in a range of finishes including matte black, brushed nickel, and brushed gold. Every fixture is built with solid brass construction for durability that outlasts the typical faucet replacement cycle.
Explore our full collection: Freestanding Faucets & Tub Fillers →

Eric is the founder and president of Badeloft USA. He has been the president of Badeloft’s US division for over ten years and oversees all marketing and branding aspects of Badeloftusa.com.
His expertise lies in small business development, sales, and home and bathroom industry trends and information.
Contact us with any business related inquiries.
Badeloft is dedicated to helping homeowners make informed decisions about their bathrooms. We adhere to strict editorial guidelines to ensure our content is accurate, trustworthy, and useful.
Request free stone resin and stainless steel material samples. Delivered to your door.
Choosing the right bathtub drain stopper is essential for creating a comfortable and functional bathing experience. With over 20 common
A soaking tub is defined by one thing: depth. Where a standard alcove tub sits around 14 inches deep, a

Spring is when most bathroom remodels get serious. The weather breaks, contractors open up, and that upgrade you have been
A Japanese soaking tub, known traditionally as an ofuro, is designed for one purpose: full-body immersion. Unlike Western bathtubs built
Request your free material sample below. By submitting, you agree to receive occasional product updates and offers from Badeloft. Unsubscribe anytime.
"*" indicates required fields